GitHub Made Easy: Clone and Upload Your Projects in Minutes!

Introduction
GitHub is a popular platform for version control and collaborative software development.
One of the fundamental tasks you'll often perform is cloning a repository to your local machine and uploading your project to GitHub.
In this blog, we will walk through the steps to achieve this with clear explanations and commands.
Prerequisites
A GitHub account
Git installed on your local machine
A project to upload
Step 1: Cloning a Repository
Cloning a repository means creating a local copy of the repository on your computer. This allows you to work on the project locally and sync changes with the remote repository.
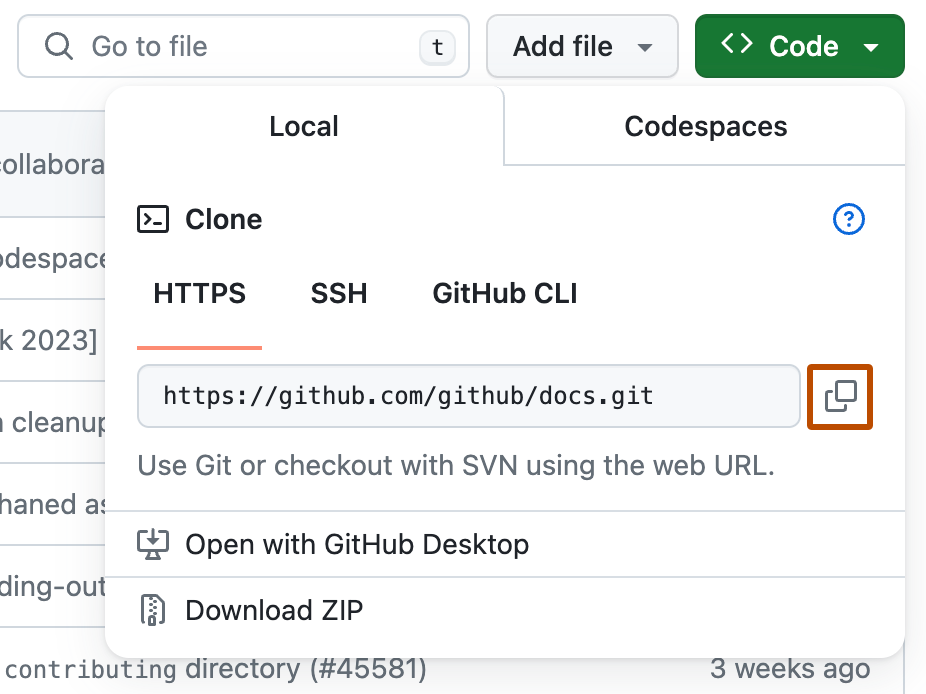
Find the Repository URL
Go to the GitHub repository you want to clone. Click on the green "Code" button and copy the URL (HTTPS, SSH, or GitHub CLI).
Open Your Terminal or Command Prompt
On your computer, open the terminal (Linux/Mac) or command prompt (Windows).
Run the Git Clone Command
Use the following command to clone the repository to your local machine:
git clone <repository-url>Replace
<repository-url>with the URL you copied from GitHub. For example:git clone https://github.com/username/repository.gitThis command will create a directory with the name of the repository and copy all the repository files into it.
Step 2: Navigating to Your Project Directory
After cloning the repository, navigate to the project directory using the cd command:
cd repository
Replace repository with the actual name of your cloned directory.
Step 3: Adding Your Project Files
If you already have a project on your local machine that you want to upload to GitHub, copy all the project files into the cloned repository directory. Make sure to replace any existing files if necessary.
Step 4: Adding Changes to the Repository
Check the Status
Before adding changes, it's a good practice to check the status of your repository:
git statusThis command will show you the changes that are staged, unstaged, and untracked.
Stage the Changes
Add the files to the staging area using the
git addcommand:git add .The
.(dot) adds all the changes in the current directory. You can also add specific files or directories:git add filenameCommit the Changes
Commit your changes with a meaningful message using the
git commitcommand:git commit -m "Your commit message"
Step 5: Pushing Changes to GitHub
Push the Changes
Push the committed changes to the remote repository using the
git pushcommand:git push origin mainReplace
mainwith the name of your branch if it is different.
Step 6: Creating a New Repository and Pushing Local Project
If you have a project on your local machine and want to upload it to a new GitHub repository, follow these steps:
Create a New Repository on GitHub
Go to your GitHub account, click on the "New" button to create a new repository. Fill in the repository name, description (optional), and choose its visibility (public or private). Do not initialize the repository with a README.
Initialize Git in Your Project Directory
Navigate to your project directory and initialize a new Git repository:
 cd path/to/your/project
 git init
Add the Remote Repository
Add the GitHub repository as a remote:
git remote add origin https://github.com/username/repository.gitReplace
usernameandrepositorywith your GitHub username and repository name.Stage and Commit Your Project Files
 git add .
 git commit -m "Initial commit"
Push the Project to GitHub
git push -u origin mainThe
-uflag sets the upstream branch, so you can usegit pushwithout specifyingorigin mainin future pushes.
Conclusion
- By following these steps, you can easily clone a repository from GitHub to your local machine, make changes, and push them back to GitHub.


